Tutorial: Freestanding SCION Network
This document helps you set up a freestanding SCION demo network, which consists of a stand-alone complete SCION environment distributed among five computers. The demo environment contains one SCION Isolation Domain (ISD), with three core Autonomous Systems (AS) and two non-core, leaf ASes.
If you want to go deep and help develop SCION, use the development environment. See Setting up the Development Environment.
If you want to experiment with SCION in a larger environment, use SCIONLab. For more information, see https://www.scionlab.org/.
Note: This tutorial does not describe how to set up SCION endhosts. For endhosts please follow the instructions of your SCION library or application.
Setup
This first section provides an overview of the setup and topology of the sample demo environment.
Infrastructure
The sample SCION demo setup consists of one ISD with three core ASes and two non-core, leaf ASes. The following table lists some details of the sample ISD and each AS in it, such as the DNS names, the ISD- and AS numbers, the kind of AS (core or leaf) and the IP addresses. This infrastructure could be virtual machines or bare metal.
Hostname |
ISD |
AS |
Purpose |
Notes |
IP Address |
OS |
Disk |
RAM |
|---|---|---|---|---|---|---|---|---|
scion01 |
42 |
ffaa:1:1 |
Core |
Voting, CA |
10.0.0.1 |
Ubuntu 22.04.3 LTS |
4 GB |
1 GB |
scion02 |
42 |
ffaa:1:2 |
Core |
Non-Voting, CA |
10.0.0.2 |
Ubuntu 22.04.3 LTS |
4 GB |
1 GB |
scion03 |
42 |
ffaa:1:3 |
Core |
Voting |
10.0.0.3 |
Ubuntu 22.04.3 LTS |
4 GB |
1 GB |
scion04 |
42 |
ffaa:1:4 |
Leaf |
10.0.0.4 |
Ubuntu 22.04.3 LTS |
4 GB |
1 GB |
|
scion05 |
42 |
ffaa:1:5 |
Leaf |
10.0.0.5 |
Ubuntu 22.04.3 LTS |
4 GB |
1 GB |
Table 1: Required Infrastructure
Sample SCION Demo Topology
The topology of the ISD includes the inter-AS connections to neighboring ASes, and defines the underlay IP/UDP addresses of services and routers running in this AS. This is specified in topology files - this guide later explains how to configure these files. A following graphic depicts the topology on a high level.
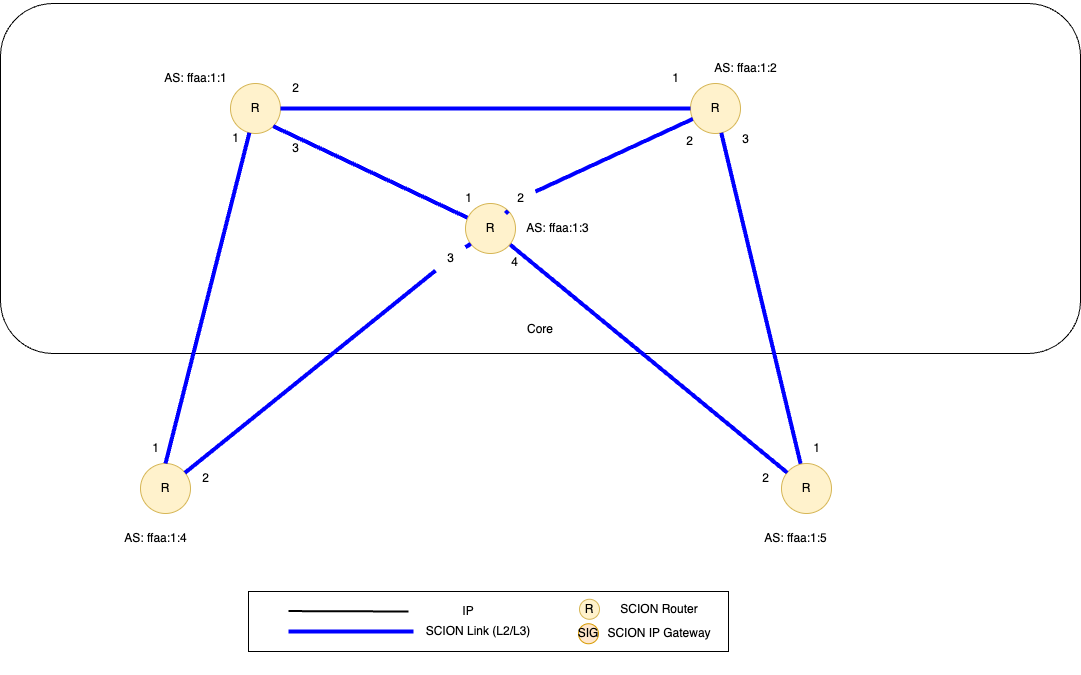
Figure 1 - Topology of the sample SCION demo environment. It consists of 1 ISD, 3 core ASes and 2 non-core ASes.
Infrastructure Prerequisites
This deployment requires five virtual machines (VMs) - one for each AS. We recommend using Ubuntu VMs for this.
5 VMs - Ubuntu 22.04.3 LTS (Jammy Jellyfish). For more information, see Ubuntu Jammy Jellyfish.
Each VM should have at least one IP address reachable by the other VMs. (If on AWS, be sure to set up the appropriate security groups.)
Each VM will need internet access to download the required files (or you will need an alternate way to download the SCION binaries).
One VM (scion01) should have SSH access (password or SSH keys) to the other hosts scion{02-05} to copy generated configuration files and keys.
Using the naming convention for each VM of scion01, scion02, scion03, scion04, and scion05 will help follow along with this tutorial.
The VM names scion01-scion05 can be configured in /etc/hosts.
Tasks to Perform
To create the sample ISD environment, you need to perform the following tasks, in this order:
Task 1: OS setup (OS Setup)
Task 2: Installation (Software Download and Installation)
Task 3: Configuration (Configuration)
Task 4: Testing your environment (Testing the Environment)
The following sections explain the required tasks, one section per task.
OS Setup
Set up the host file
The host file (/etc/hosts) will need to be updated with the IP addresses of 5 VMs. This will need to be updated on scion01-scion05. Replace the IP addresses with the assigned IP addresses for the VMs deployed.
Set this up on scion01-scion05.
# additions to /etc/hosts
10.0.0.1 scion01
10.0.0.2 scion02
10.0.0.3 scion03
10.0.0.4 scion04
10.0.0.5 scion05
Software Download and Installation
The SCION software can be installed from Debian packages, downloaded from our latest release. Note that we have to install the software five times, on each of the VMs scion01-scion05. Execute the following commands on each VM:
cd /tmp/
wget https://github.com/scionproto/scion/releases/download/v0.11.0/scion_v0.11.0_deb_amd64.tar.gz
tar xfz scion_v0.11.0_deb_amd64.tar.gz

sudo apt install ./scion*.deb
As each virtual machine represents an AS in your demo environment, we will now refer to the VMs as ASes.
Configuration
To configure your demo SCION environment, perform the following steps.
Step 1 - AS Topology Files
For this tutorial, we have provided the AS topology files - one per each AS. These files represent each AS’s local view of the global network topology described above.
AS 1 (42-ffaa:1:1):
topology1.jsonAS 2 (42-ffaa:1:2):
topology2.jsonAS 3 (42-ffaa:1:3):
topology3.jsonAS 4 (42-ffaa:1:4):
topology4.jsonAS 5 (42-ffaa:1:5):
topology5.json
Download the AS topology files onto each host scion01 through scion05.
Copy the download link above and use wget to download appropriate file for each host, installing it as /etc/scion/topology.json.
On scion01, download the topology1.json file. On scion02, download topology2.json and repeat as such on scion03, scion04, and scion05.
wget LINK_TO_TOPOLOGY.JSON_FILE -O /etc/scion/topology.json
The AS topology files reference the hosts scion01-05 by host name.
Ensure that you have set up the /etc/hosts file (see above) or replace the hostnames with IP addresses.
Step 2 - Generate the Required Certificates
The various cryptographic certificates need to be generated for each of the ASes. This requires first setting up the TRC for this ISD, and then issuing AS-certificates from the CAs.
For the sake of simplicity in this tutorial, we create all the keys and certificates centrally, and distribute the crypto material to the individual ASes. In practice, the private keys of ASes are of course never revealed to other entities; the TRC would be created in a TRC Signing Ceremony involving representatives of all core ASes. The creation of the AS-certificates would involve a certificate-signing request to the CA.
Challenge
Instead of following the steps below, act out the full TRC creation ceremony and the creation of AS certificates via certificate signing requests. Refer to the documentation on the TRC Signing Ceremony, CA Certificates and AS Certificates.
To generate all required certificates, execute the following script on any machine where
scion-pkiis installed (e.g. scion01).#!/bin/bash set -euo pipefail mkdir /tmp/tutorial-scion-certs && cd /tmp/tutorial-scion-certs mkdir AS{1..5} # Create voting and root keys and (self-signed) certificates for core ASes pushd AS1 scion-pki certificate create --profile=sensitive-voting <(echo '{"isd_as": "42-ffaa:1:1", "common_name": "42-ffaa:1:1 sensitive voting cert"}') sensitive-voting.pem sensitive-voting.key scion-pki certificate create --profile=regular-voting <(echo '{"isd_as": "42-ffaa:1:1", "common_name": "42-ffaa:1:1 regular voting cert"}') regular-voting.pem regular-voting.key scion-pki certificate create --profile=cp-root <(echo '{"isd_as": "42-ffaa:1:1", "common_name": "42-ffaa:1:1 cp root cert"}') cp-root.pem cp-root.key popd pushd AS2 scion-pki certificate create --profile=cp-root <(echo '{"isd_as": "42-ffaa:1:2", "common_name": "42-ffaa:1:2 cp root cert"}') cp-root.pem cp-root.key popd pushd AS3 scion-pki certificate create --profile=sensitive-voting <(echo '{"isd_as": "42-ffaa:1:3", "common_name": "42-ffaa:1:3 sensitive voting cert"}') sensitive-voting.pem sensitive-voting.key scion-pki certificate create --profile=regular-voting <(echo '{"isd_as": "42-ffaa:1:3", "common_name": "42-ffaa:1:3 regular voting cert"}') regular-voting.pem regular-voting.key popd # Create the TRC mkdir tmp echo ' isd = 42 description = "Demo ISD 42" serial_version = 1 base_version = 1 voting_quorum = 2 core_ases = ["ffaa:1:1", "ffaa:1:2", "ffaa:1:3"] authoritative_ases = ["ffaa:1:1", "ffaa:1:2", "ffaa:1:3"] cert_files = ["AS1/sensitive-voting.pem", "AS1/regular-voting.pem", "AS1/cp-root.pem", "AS2/cp-root.pem", "AS3/sensitive-voting.pem", "AS3/regular-voting.pem"] [validity] not_before = '$(date +%s)' validity = "365d"' \ > trc-B1-S1-pld.tmpl scion-pki trc payload --out=tmp/ISD42-B1-S1.pld.der --template trc-B1-S1-pld.tmpl rm trc-B1-S1-pld.tmpl # Sign and bundle the TRC scion-pki trc sign tmp/ISD42-B1-S1.pld.der AS1/sensitive-voting.{pem,key} --out tmp/ISD42-B1-S1.AS1-sensitive.trc scion-pki trc sign tmp/ISD42-B1-S1.pld.der AS1/regular-voting.{pem,key} --out tmp/ISD42-B1-S1.AS1-regular.trc scion-pki trc sign tmp/ISD42-B1-S1.pld.der AS3/sensitive-voting.{pem,key} --out tmp/ISD42-B1-S1.AS3-sensitive.trc scion-pki trc sign tmp/ISD42-B1-S1.pld.der AS3/regular-voting.{pem,key} --out tmp/ISD42-B1-S1.AS3-regular.trc scion-pki trc combine tmp/ISD42-B1-S1.AS{1,3}-{sensitive,regular}.trc --payload tmp/ISD42-B1-S1.pld.der --out ISD42-B1-S1.trc rm tmp -r # Create CA key and certificate for issuing ASes pushd AS1 scion-pki certificate create --profile=cp-ca <(echo '{"isd_as": "42-ffaa:1:1", "common_name": "42-ffaa:1:1 CA cert"}') cp-ca.pem cp-ca.key --ca cp-root.pem --ca-key cp-root.key popd pushd AS2 scion-pki certificate create --profile=cp-ca <(echo '{"isd_as": "42-ffaa:1:2", "common_name": "42-ffaa:1:2 CA cert"}') cp-ca.pem cp-ca.key --ca cp-root.pem --ca-key cp-root.key popd # Create AS key and certificate chains scion-pki certificate create --profile=cp-as <(echo '{"isd_as": "42-ffaa:1:1", "common_name": "42-ffaa:1:1 AS cert"}') AS1/cp-as.pem AS1/cp-as.key --ca AS1/cp-ca.pem --ca-key AS1/cp-ca.key --bundle scion-pki certificate create --profile=cp-as <(echo '{"isd_as": "42-ffaa:1:2", "common_name": "42-ffaa:1:2 AS cert"}') AS2/cp-as.pem AS2/cp-as.key --ca AS2/cp-ca.pem --ca-key AS2/cp-ca.key --bundle scion-pki certificate create --profile=cp-as <(echo '{"isd_as": "42-ffaa:1:3", "common_name": "42-ffaa:1:3 AS cert"}') AS3/cp-as.pem AS3/cp-as.key --ca AS1/cp-ca.pem --ca-key AS1/cp-ca.key --bundle scion-pki certificate create --profile=cp-as <(echo '{"isd_as": "42-ffaa:1:4", "common_name": "42-ffaa:1:4 AS cert"}') AS4/cp-as.pem AS4/cp-as.key --ca AS1/cp-ca.pem --ca-key AS1/cp-ca.key --bundle scion-pki certificate create --profile=cp-as <(echo '{"isd_as": "42-ffaa:1:5", "common_name": "42-ffaa:1:5 AS cert"}') AS5/cp-as.pem AS5/cp-as.key --ca AS2/cp-ca.pem --ca-key AS2/cp-ca.key --bundle
Note
The script above will generate a new TRC for your ISD and must be done exactly once. Once you deploy such TRC on your machines, further TRC updates must be sequential. If for any reason you need to reset your setup and you need to deploy a fresh new TRC generated with the script above, then you must first delete the local DB files on your hosts (in
/var/lib/scion/).The just-generated crypto material in can now be copied to the respective AS VMs.
cd /tmp/tutorial-scion-certs
for i in {1..5}
do
   ssh scion0$i 'mkdir -p /etc/scion/{crypto/as,certs}'
   scp AS$i/cp-as.{key,pem} scion0$i:/etc/scion/crypto/as/
   scp ISD42-B1-S1.trc scion0$i:/etc/scion/certs/
done
Step 3 - Generate Forwarding Secret Keys
Two symmetric keys master0.key and master1.key are required per AS as the forwarding secret keys. These symmetric keys are used by the AS in the data plane to verify the MACs in the hop fields of a SCION path (header).
head -c 16 /dev/urandom | base64 - > /etc/scion/keys/master0.key
head -c 16 /dev/urandom | base64 - > /etc/scion/keys/master1.key
Repeat the above on each host scion01 - scion05.
Step 4 - Service Configuration Files
Next, you have to download the service configuration file for the router and control service into the /etc/scion/ directory of each AS host scion01-scion05.
Refer to the Router Configuration and Control service configuration manuals for details.
We use default settings for most of the available options, so that the same configuration file can be used in all of the VMs.
Download the files, then copy it into the /etc/scion/ directory of each host scion01 - scion05.
Step 5 - Start the Services
Start the SCION services on each of the five ASes. Specifically, we start the Router, Control Service, Daemon and Dispatcher processes, by starting their systemd units. The dispatcher starts automatically as dependency of the control service and daemon.
Execute the following commands on every AS:
sudo systemctl start [email protected]
sudo systemctl start [email protected]
sudo systemctl start scion-daemon.service
# Check that all services are active
systemctl status scion-*.service
These steps need to be repeated on each host scion01 - scion05.
Testing the Environment
You can now test your environment. The code block below includes some tests you could perform to check whether your environment works well.
Verify that each host has a SCION address. This can be verified with the scion address command as shown below.
scion01$ scion address
42-ffaa:1:1,127.0.0.1
Verify that each host can ping the other hosts via SCION. This can be done with the scion ping command. In the example below, we are pinging between scion01 (AS 42-ffaa:1:1) to scion05 (AS 42-ffaa:1:5). Very that each AS can ping every other AS.
scion01$ scion ping 42-ffaa:1:5,127.0.0.1 -c 5
Resolved local address:
127.0.0.1
Using path:
Hops: [42-ffaa:1:1 3>1 42-ffaa:1:3 4>2 42-ffaa:1:5] MTU: 1472 NextHop: 127.0.0.1:31002

PING 42-ffaa:1:5,127.0.0.1:0 pld=0B scion_pkt=112B
120 bytes from 42-ffaa:1:5,127.0.0.1: scmp_seq=0 time=0.788ms
120 bytes from 42-ffaa:1:5,127.0.0.1: scmp_seq=1 time=3.502ms
120 bytes from 42-ffaa:1:5,127.0.0.1: scmp_seq=2 time=3.313ms
120 bytes from 42-ffaa:1:5,127.0.0.1: scmp_seq=3 time=3.838ms
120 bytes from 42-ffaa:1:5,127.0.0.1: scmp_seq=4 time=3.401ms

--- 42-ffaa:1:5,127.0.0.1 statistics ---
5 packets transmitted, 5 received, 0% packet loss, time 5000.718ms
rtt min/avg/max/mdev = 0.788/2.968/3.838/1.105 ms
Verify that each host has a full table of available paths to the other ASes. This can be done with the scion showpaths command. In the example below, we are displaying the paths between scion01 (AS 42-ffaa:1:1) to scion05 (AS 42-ffaa:1:5). There should be multiple paths through the core ASes.
scion01$ scion showpaths 42-ffaa:1:5
Available paths to 42-ffaa:1:5
3 Hops:
[0] Hops: [42-ffaa:1:1 2>1 42-ffaa:1:2 3>1 42-ffaa:1:5] MTU: 1472 NextHop: 127.0.0.1:31002 Status: alive LocalIP: 127.0.0.1
[1] Hops: [42-ffaa:1:1 3>1 42-ffaa:1:3 4>2 42-ffaa:1:5] MTU: 1472 NextHop: 127.0.0.1:31002 Status: alive LocalIP: 127.0.0.1
4 Hops:
[2] Hops: [42-ffaa:1:1 2>1 42-ffaa:1:2 2>2 42-ffaa:1:3 4>2 42-ffaa:1:5] MTU: 1472 NextHop: 127.0.0.1:31002 Status: alive LocalIP: 127.0.0.1
[3] Hops: [42-ffaa:1:1 3>1 42-ffaa:1:3 2>2 42-ffaa:1:2 3>1 42-ffaa:1:5] MTU: 1472 NextHop: 127.0.0.1:31002 Status: alive LocalIP: 127.0.0.1
Conclusion
Congratulations, you now have a working SCION configuration, which consists of a stand-alone complete SCION environment distributed among five computers. This environment contains one SCION Isolation Domain (ISD), with three core ASes and two non-core, leaf ASes. Being a demo, this configuration has some limitations:
The certificates are only good for three days unless explicitly renewed using scion-pki certificate renew.
Each AS contains a single host running all the SCION services. In a typical deployment, these services would run a separate hosts and include multiple border routers.
This environment does not include a SCION-IP gateway.
See also
- SCION Overview
Introduction to the SCION architecture and core concepts.
- Setting up the Development Environment
If you would like to learn more and help develop SCION, consider setting up the development environment.
- SCIONLab
If you would like to experiment with SCION in a larger deployment, consider joining SCIONLab.